Weekly Salad 20: Fresh Peas with Lettuce


The summer season is finally here and I’ve been trying to fit as many u-pick dates as I can for the various fruits and vegetables that are available in our area. Our first picking took place at Rowe’s Produce Farm in Ypsilanti, Michigan. Like good ol’ city folk, we got up at sunrise and headed out to the fields to pick their strawberries as well as their peas. Picking peas is not so bad because they’re usually clustered together. Shelling them wasn’t bad either (better than shelling favas, that’s for sure).

Fresh peas are a real treat if you can get them. They have a firm flesh that is not as starchy as canned or frozen ones tend to be. They’re nice any way you prepare them – steamed, sautéed or boiled. For this salad, gently steam the peas until they’re just cooked and toss them with lettuce and top with a poached egg for an easy and delicious salad.


With the green shells, I made a quick soup by cooking them with some chicken broth, one small peeled potato (to add body to the soup), one garlic clove, some onion, and S&P until soft. I blended the whole thing and strained it through a sieve. You can add a little milk or cream to the mix before serving. Nothing to waste – rien ne se jete.


PEA SHELL SOUP


ADIEU EVERYDAY COOK


On Saturday, June 21, Pierre and I ate our last lunch at Everyday Cook in Kerrytown – downtown Ann Arbor – it was the restaurant’s final day before closing. It was a bittersweet time for us as we appreciate what they were doing there, providing fresh, inventive food from a daily changing menu featuring local ingredients. I ordered Chef Brendan’s Chicken & Chorizo Paella with Peas & Roasted Red Peppers and Pierre ordered the Pork Tenderloin with Quince Aioli & Orange Asparagus Salad. Both were great. I wish I knew how the quince aioli was made – it tasted divine. We also shared a St. James tart with none other than KitchenChick – who, incidentally, sat at the same table as us. We wish the chefs and the owners much luck and hope that they find another food venture that can excite people the way Everyday Cook did.

Check out these blog posts:

Picking strawberries and peas from Four Obsessions

Fresh peas two ways from KitchenChick


Bon appétit!


Weekly Salad 19: Gỏi Mít – Vietnamese Green Jackfruit Salad


Goi Mit


Here is a salad that we had in Viet Nam on our last trip. It’s a nice change from the usual Gỏi of either cabbage, cucumbers, lotus root, mango, and papaya, – which I love all the same. Green, unripe jackfruit is something I didn’t grow up eating but have come to really enjoy since trying it in Viet Nam. Until fairly recently, the only types of jackfruit available in the States were the canned version that was packed in syrup, dried or perhaps frozen in plastic packages — all of ripened fruit. Nowadays, fresh and ripened jackfruit has become available, though still quite dear. To see what the inside of a fresh jackfruit looks like and watch a video on how to harvest a ripened fruit, head over to WhiteOnRiceCouple‘s post here.

Outside of Southeast Asia (as well as parts of South America, Australia and Africa), young and unripe (green) jackfruit (Mít Non) is mainly available packed in water or brine and canned. Unlike ripe (yellow) jackfruit, unripe jackfruit can be eaten whole – that is, flesh and seeds, as both are still tender. It has a fairly neutral taste that seems to absorb whatever dressing you give it and serves as a textural contrast to the shrimp, pork, sesame seeds (or peanuts) and crunchy fried shallots. My favorite brand for green jackfruit is Richin – I’ve found that the fruit is never discolored but is white and unblemished and the texture tender without being mushy.


Green Jackfruit


GỞI MÍT TÔM THỊT – VIETNAMESE GREEN JACKFRUIT SALAD WITH SHRIMP AND PORK

INGREDIENTS: (4 main-dish servings)

  • Three (3) cans – 10 oz. (280 grams) of green (unripe) jackfruit
  • juice of 1 small-medium lime
  • 1 Tbl. (15g) sugar
  • 1 (5g) tsp. salt
  • 1/2 lb. (225g) poached pork tenderloin or pork belly [chicken breast can also be substituted]
  • 1/2 lb. (225g) fresh unpeeled, de-veined shrimp
  • large handful of Viet. coriander (rau răm) and spearmint (rau húng)
  • 1 Tbl. (15g) lightly toasted white sesame seeds
  • 3 Tbl. (45g) Crispy Fried Shallots (hành phi)
  • sweet-sour dressing – (nước chấm)
  • lightly crushed, freshly roasted peanuts (optional)
  • shrimp chips (bánh phồng tôm) or Viet sesame rice crackers (bánh tráng mè)

In a skillet, dry-fry the shrimp for several minutes until opaque in color. Allow to cool before removing shells – leaving the tails intact. Set aside.

Poach the pork until cooked through. The internal temperature should reach 160F. Allow to cool before thinly slicing into 1/4 inch (.5cm) strips. Soak the jackfruit in clean water for about 15 minutes. Drain and (using your hands or a potato ricer) squeeze the jackfruit segments to remove excess liquid. Cut the jackfruit segments into thin strips, similar in size to the pork. In a small bowl, dissolve the sugar, lime and salt. Once dissolved, add the jackfruit along with the pork and toss to combine. Set aside.

In a large bowl combine the marinated jackfruit and pork with the shrimp and herbs (I leave the herbs whole, but you can roughly chop them if you prefer). Just before serving, toss the ingredients with 2-3 Tbl. of Nước Chấm (add more or less depending on your taste). Transfer to a serving plate. Scatter sesame seeds, fried shallots and crushed peanuts (optional) over the top of the dish. Serve with shrimp chips or sesame rice crackers.


Bon appétit!


Andalucía Calling


flamco1


Several weeks ago, we joined our friends Gina and Raphael, along with Gina’s parents, Ricardo and Anna Maria, for an evening at Ann Arbor’s Performance Network. That night, Valeria “La Chispa” Montes and Company performed the music and dance of flamenco. La Chispa and Company are a local flamenco group based in Detroit and were in Ann Arbor for a one-night special performance. We felt really lucky to catch this group as flamenco is something both Pierre and I love. Sometimes, I walk around the house with my arms in the air while stomping my feet, saying “Eso!!!” Actually, we both do.

La Chispa truly rocks because she embodies all the things I love about artists and dancers — the fire within, the physical strength and balletic grace. She and her company of guitar players and guest dancers will be performing this summer in Detroit’s Concert of Colors on July 19 at 2pm. You won’t regret seeing them at this great event and, who knows, you might even spot in the audience a very small Asian chick struttin’ around with castanets.

Below are photos of La Chispa and Company taken by Pierre.


flamco2


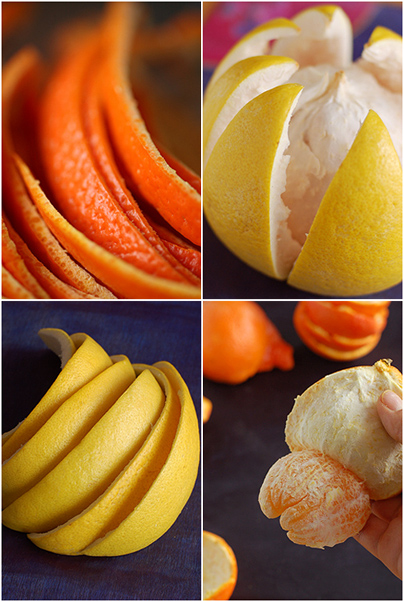
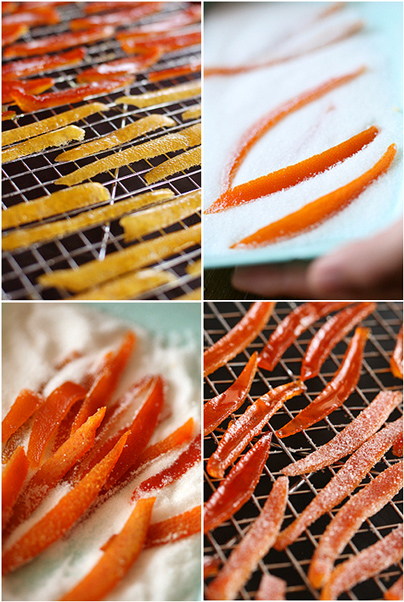
While watching their performance, I really felt transported to Spain, even if it were only a short while. Although I’ve never traveled to Andalucía or any part of Spain, I somehow felt a bit homesick for this part of the world I’ve only known through its food, music and dance. I was this close from booking the next flight to any city on the Iberian peninsula. Luckily, my good friend Carmen had gifted me some dried Chufa nuts (aka tigernuts) that she brought back from her last trip to her home country. I used them to make one of my favorite drinks – horchata.


horchata1


In Spain, chufas are used to make a lovely and refreshing drink – Horchata de Chufas, a Valencian specialty. This nutty, milky drink is just what I needed. With this hot, humid spell we had, it was an even better treat. Horchata is also made all over Latin America with various ingredients like rice, almonds, sesame seeds, to name a few. Horchata made from chufas has this unmistakable earthy scent and nutty flavor that is very different than horchata made from other ingredients. If you travel to Spain, you can purchase them at candy shops that sell frutos secos. Here, in the States, one place I’ve found selling chufa nuts is La Tienda, where you can order them online. The recipe below is from their site.


horchata2


HORCHATA DE CHUFAS – SPANISH TIGERNUT MILK

recipe from La Tienda

INGREDIENTS (approx. 1 liter)

  • 250 grams chufa nuts (about 7 ounces)
  • 1 quart (liter) of water
  • one cinnamon stick (optional)
  • 1 tsp grated lemon peel (optional)
  • about 1 cup of sugar (try the recipe with less the first time – you can always add more!)

STEPS:
For one liter of Horchata, soak 250 grams of chufa nuts in water for 24 hours. In a blender, grind the nuts, water, cinnamon, sugar and lemon until you have an even, smooth mixture. Let it sit in water for a half an hour. Press and strain the paste to obtain horchata. Refrigerate for at least an hour – then finish it in the freezer for 20 minutes until slightly slushy (optional).


tortilla1


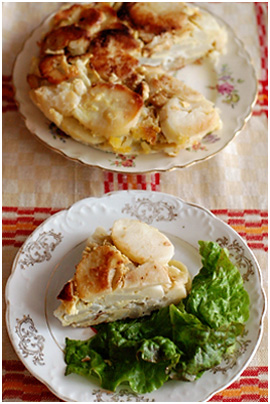
Another Spanish item that I’ve enjoyed at my friend Carmen’s home was Tortilla. Not the flat, round disks made from flour or corn but a thick potato and egg omelet. It really is amazing how a dish of three simple ingredients of potatoes, eggs and onions can be so good. Served with a plain green salad tossed with salt, olive oil and vinegar, it’s the perfect dinner. Cut into small wedges or squares, tortilla is great for parties or picnics too. The recipe I used is from Gourmet Traveller. You can get the recipe I used and watch a video on how to make Tortilla here.


tortilla2jpg


TORTILLA

recipe from GourmetTraveller

INGREDIENTS: (6 servings)

  • 1/3 cup (80ml) extra-virgin olive oil
  • 1 onion, sliced into thin rings
  • 6 eggs
  • 1 lb (½ kg) boiled potatoes, thinly sliced
  • 1 tsp sweet paprika
  • 6 Piquillo peppers, drained

STEPS:

To make tortilla, heat 1/4 cup (60ml) olive oil in a 10-inch (25cm) non-stick frying pan over medium heat, add onion and sauté for 3-5 minutes or until softened. Using a slotted spoon transfer to a small bowl, leaving any residual oil in the frying pan.

Meanwhile, lightly beat the eggs in a large bowl and season generously with sea salt and freshly ground black pepper. Add potatoes, onions and paprika and combine well. Let mixture marinate for a couple of hours in the refrigerator, preferably overnight. Remove tortilla mixture from refrigerator 30 minutes before planning to cook it.

To make tortilla, heat the frying pan again, adding remaining 1 tbsp olive oil, over medium heat. When oil begins to smoke slightly, add tortilla mixture to pan, shaking pan vigorously so that egg mixture amalgamates in bottom of pan. Reduce heat and cook for 4-5 minutes or until mixture all but sets. Place a plate over the frying pan and carefully invert the frying pan so that tortilla is on plate uncooked side down. Return frying pan to heat, carefully slide tortilla back in and cook for a further 4-5 minutes until tortilla is firm to the touch.

Transfer to a serving plate and allow to cool before serving. Cut into wedges and serve with Piquillo peppers and alioli if desired.

¡Buen Provecho!


Weekly Salad 18: Mango Salad


mango


Mangoes are a favorite fruit of mine. I’ll take a mango over a pear or an apple any day – yeah, even a Michigan apple(!). When I have in mah hot hands some ripe mangoes, you will undoubtedly find me eating all of the fruit and then standing over the sink and gnawing the seed, my hands and wrists covered in sticky mango juice. Because that is the only sensible thing to do.

Perhaps not as popular or common as papaya salad, mango salad (Gỏi Xoài) has all the crunchy and herbally goodness of the version made with papaya. Traditionally made with firm, green mangoes (Xoài Xanh), it’s another simple and rather addictive salad that is great for the muggy weather we’ve been having here. WanderingChopsticks has a really, really great version here. For mine, I used regular, very firm, unripe mangoes that I peeled and then shredded using the blue Kiwi knife, some fresh spearmint, some sliced red bell pepper, and the usual sweet-tart-tangy dipping sauce.

Bon appétit!


Weekly Salad 17: Grilled Romaine and Parmesan


romaine


When I think of salads, I think of crisp, cool vegetables and lettuce. I don’t always think of cooking lettuce but the times I’ve tried it, I’ve realized how nice it can be. Cooking, particularly grilling lettuce seems to really bring out its sweetness and flavor. Romaine is a fairly hardy lettuce that can really stand up to the heat of the grill. It goes from being firm and crisp to tender and juicy in a matter of minutes. For this salad, I cut the romaine hearts in half lengthwise and generously brushed the cut sides with olive oil before grilling them for about 2-3 minutes until slightly wilted. After that, all they need is sea salt, fresh cracked pepper, a final drizzle of olive oil and a generous sprinkling of grated parmesan cheese. Serve warm.

Bon appétit!


DAFFODILS AT MATTHAEI BOTANICAL GARDENS, ANN ARBOR

jonq


Candied Citrus Peel – Tangelo and Pomelo


CandiedCitrus


I hit the tail end of the citrus season with a slightly frenzied and frenetic pace this year. It seemed like I was never going to have enough time to make use of all the pomelos, minneola tangelos, meyer lemons and blood oranges that I would gleefully find in the produce aisle. Their beautiful yet brief appearance at grocery stores here in Michigan was one of the few things that kept me from jumping off a bridge in mid-February. Have you noticed how folks who live in or near the tropics are so damn happy all the time? Hello – they have teh sun! I think the way the cold drags on can be downright miserable for some of us (tele-skiers being exempt, of course.)

Oh, it’s not all doom and gloom, friends. Thanks to Jen, I had the inspiration and know-how to make candied citrus peels. Instant sunshine and a little happiness — that is what they bring. What I find most appealing about making this is that it is the ultimate Recycling Addict’s recipe: the fruit is eaten, the peel is candied and the citrus-y syrup left over from the candying process can be used to sweeten lemonades, coffee, tea; for brushing the tops of sweet breads and loaves, for making meringue with citrus flavor, etc.; nothing to waste, or rien ne se jete, as Warda wrote on her post for making candied orange zest.

Tangleos make excellent candidates for candying because their peel comes off rather easy, much like tangerines. Their strong fragrance and striking, almost crimson color add a gourmet touch to any candy tray. Pomelos are a favorite fruit of mine and I was curious about how they would turn out. Luckily, they turned out just as delicious as the candied tangelos.


Candied citrus

Candied Tangelos

Sugared


I adapted Jen’s recipe to suit my tendency towards eating “less sweet” desserts. Of course, that seems a bit silly since we’re talking about candying fruit. Nevertheless, I prefer to scrape away as much of the pith after blanching the peels (before candying them) because I want to think that less pith means less matter for the sugar to adhere and attach itself to. I sliced the peels only after the blanching process was complete because I found the delicate tangelo peels fared better that way (less breakage). As a result, they were slightly more delicate and a bit more tender than regular orangettes. I think some fruit need to be blanched more than others. I blanched the tangelos three times and the pomelos five times before I felt enough of the bitterness was removed. Also, I did not dip them in chocolate as Jen did but, maybe next time. Lord knows I like to gild the lily. Besides, there’s always another fabulous winter to look forward to…


CANDIED TANGELOS and POMELOS

adapted from Use Real Butter

5-6 tangelo minneolas or 2 pomelos
2 3 cups (600g) sugar
2 cups (480mL) water

1 cup (200g) sugar for rolling
or
8 oz (~230g) chocolate for dipping

Harvest the peel by scoring the tangelo vertically along the center (think Earth’s Meridian). Carefully pull the peel back so that you end up with two hollow halves of tangelo peel. Repeat with the rest of the fruit. For the pomelos, score the fruit into 5 or 6 sections and peel back and separate the skin from the fruit. Because pomelos have so much pith, I used a sharp paring knife to cut some of the pith – in a similar manner as I would to fillet fish. (I don’t know if this decreased the number of times I would need to blanch the peels, but I thought it didn’t hurt.)

Place peel halves/segments in a large saucepan and cover with cold water. Heat on high until water comes to a boil. Pour off the water. Repeat three times more (or however many times you think is enough to remove bitterness). Once the blanching is complete, use a sharp spoon to [carefully] scrape off some of the pith (as much as desired.) Cut peel into 1/4 (or 1/2) inch [~.5 or 1.5cm] strips.

Combine sugar and water in the saucepan and bring to boil over high heat until temperature reaches 230F (110C). Add peel and reduce heat to simmer. Simmer until peels are translucent (30 minutes or longer). Remove peels from syrup and roll in sugar if desired, and set on rack to dry for several hours. Once the peel is dry, you can dip in tempered dark chocolate – shake off excess, and place on foil, wax paper, or baking sheet to dry. Store in a tupperware, or if not chocolate dipped, store in sugar.

Bon appétit!


REDBUD TREES AND THE HURON RIVER AT GALLUP PARK, ANN ARBOR


Redbuds and The Huron River


Weekly Salad 16: Goat Cheese with Candied Kumquats and Chive Vinaigrette


salad


The other day, I came home after a very long day to find a parcel waiting for me in the hallway. It was sent from Denise and Lenny from the wonderful ChezUs blog. Without even taking off my shoes, I went straight for the box. Oh, I’m just messin’ with ya, Ma — I always take my shoes off first 😉

Inside, I found a beautiful loaf of Portuguese sweet bread, candied kumquats (which came in an ultra-cool Weck jar) and some fresh kumquats they had found at the market in San Francisco. Pierre and I ate the bread with some of the kumquats the next morning for breakfast. As we were eating, all I could do was nod be all, like, Totally, Dude.

The bread was like a moist, slightly dense panettone. Although I often find candied fruits and preserves too sweet for my taste, the kumquats’ acidity and tartness really balance the sugar syrup nicely in the preserves. Denise and Lenny, Muito Obrigado and if you decide to open a mail-order business with this bread, write me down for the first dozen 🙂


chives


Now that spring is finally here (or is it?), my fresh chives are starting to make a comeback and I’ve been eager to make a vinaigrette with them. They’re not fully grown so I had to resort to herbal thievery and stole some that were growing on the other side of a neighbor’s fence. Yes, I stole some chives. And a small dogwood branch.

I used the candied kumquats in this salad and they added such a delicious tangy-sweet taste to it. With creamy goat cheese and a fresh chive vinaigrette, it’s a simple and elegant salad for any day of the week. To make the chive vinaigrette, add fresh, finely chopped chives to some dijon mustard, olive oil and wine vinegar + S&P and mix together to form a smooth, emulsified dressing. Just before serving, toss your salad greens with the dressing and top with goat cheese and a few slices of candied kumquats.


bread


bread with kumquats


Bon appétit!


Weekly Salad 15: Gỏi Bắp Cải Gà – Vietnamese Chicken & Cabbage Slaw


Viet Cabbage Slaw


I’ve slacked off a bit with posting my weekly salads. No need to be alarmed – I haven’t quite fallen off the wagon. (I did, however, eat 2 Coney hot dogs a day for three days straight, last week.) Those things are so awesome. Anyway, to balance my meat-on-a-bun binge, I’ve enjoyed this salad. It’s sort of an everyday salad because the ingredients are ones many of us usually have in stock. If you like coleslaw but want something healthier but still bright and flavorful, you could try this salad. Also, because there is no mayonnaise or cream in the dressing, it’s great for parties or picnics as there’s less of a spoilage issue.

I used Taiwanese Cabbage – which can be distinguished by its flatter shape. When cut in half, each side has an oblong shape. The leaf ribs of this cabbage are smaller and narrower than regular cabbage and it has a slightly milder (& sweeter?) taste. You can also use regular cabbage, as I often do. Red cabbage would also be nice, for both color and flavor.


GỞI BẮP CẢI GÀ – VIETNAMESE CHICKEN & CABBAGE SLAW

INGREDIENTS: (4-6 servings)

  • 1 head green [Taiwanese] cabbage, finely shredded
  • 1 large carrot, peeled and finely grated
  • 1 lb. (450 g) cooked [leftover] chicken meat (dark/white), hand shredded
  • 2 shallots, sliced into thin rings
  • large handful of fresh mint, leaves left whole or roughly-hand torn
  • large handful of fresh cilantro, coarsely chopped
  • large handful of freshly ground, toasted peanuts (optional)
  • approx. 4 Tbl. (60mL) of Spicy Sauce/Dressing (for this salad, replace 3 Tbl. (45mL) of white rice vinegar for the lime juice)

STEPS:

Combine all ingredients except for the peanuts and dressing. When ready to serve, thoroughly toss with the dressing and scatter the ground peanuts over the entire dish.

Bon appétit!